Ms excel Insert and draw tab-
We have already discussed about home tab if you want to read that post. Here we will learn how to use insert and draw tab in ms excel. You can denote his name, Insert means you want to add something in your worksheet like table, shapes, images and charts. In this tab you will get all tools to add something. My dear friends, in this post we will learn how to use insert tab and draw tab in ms excel. We will learn how to use formula tab in the next post. So let's star this post.
You can see insert tab in the above image as a example. Now let us discuss all option one by one.
Table- If you want to draw table in worksheet then you can draw from here. First select range where you want to draw table and click on the "table" button after your table automatically draw. if you want draw to draw table one by one then click on the any cell where you want to draw table and click on the table button right side arrow after that you will get some options like insert below, insert right, insert above and insert left and delete row from where you can draw table according to your need.
Shapes- There are many type shapes available here like lines, rectangles, basic shapes, block arrows, equation shapes, flow chart, stars and banners and callout. You can draw any any shapes to make you project more attractive. First select any cell where you want to draw shapes and click on the shapes button and choose any shape to draw in the work sheet. After draw, you can adjust it according to your need.
Text box- If you want to add a box in you work sheet to describe something. Then you can add a text box from here. First select any cell where you want to add box and then click on the "text box" button and type on the box what ever you want to describe.
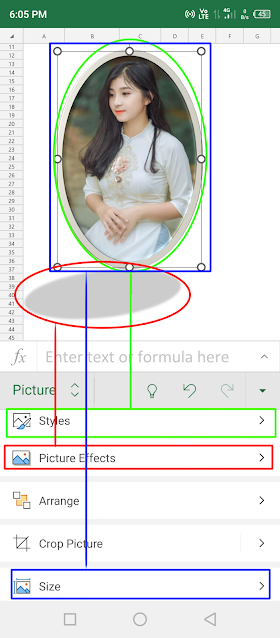
Picture- you can add any picture from here. If you want to make your project more attractive then we should definitely add pictures in our project. You should click on the picture button for add any picture after that you will automatically redirect from you galery from where you can choose any image. You can see the example in the below image.
Now here we will discuss some image related tools one by one.
Styles- There are many styles available here. You can choose one style for any one image or photo. Style means, you can add a border arround the image or photo which you like. You can see a example in the above image.
Picture effect- If you want to add effect in your image or photo like shadow and 3d shapes etc. Then select the image or photo and click on the "Picture effect" button and choose any one effect which you want to apply on the selected image or photo after that click on the enter button to apply it. You can see example in the above image.
Arrange- let, there are to photo in your worksheet and both photo are related each other and you want to make a group of these images then you make a group from here. There are some more options are available here like bring to front, send to back, ungroug, regroup, rotate image and flip image etc.
Crop picture- If image or picture size is large or there are some unuse part is available in your picture or image and you want to remove that part then you can use this tool. You can see the example in the above image.
Size- If you image or picture size is so larger or there are not enough space available in you project. Then you can use this tool to resize your image. After that you can adjust it properly. You can see the example in the above image.
Recommended- you can draw chart from here. First select you data which you want to show in your chart after that click on the recommended button.
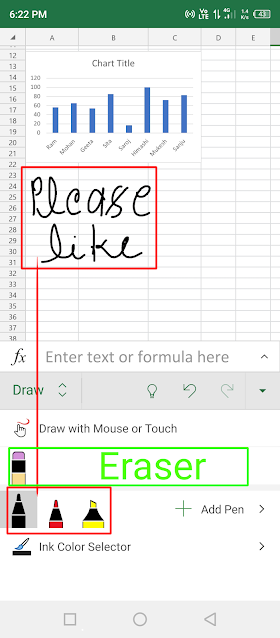
Chart- If you want to make you project more attractive and you want to add a chart in your project then you can use this tool. There are many type chart available here like column, line, bar, pie, area, map, treemap, sunbrust etc. you can use these charts according to your need. If you want to show student name and mark in a chart then first you need to select you student name and mark and choose any one chart from which chart you want to show your data after that you data will be automatically show in the chart. You can see example in the above image.
Comment- If you want to describe something about any particular word then you can use this tool. First select range where you want to add comment And click on the comment button after that write your comment. You can see example in the above image.
Link- If you want to add a url for go to any website and other then you can use this option. First select range where you want to add link after that click on this icon and paste or type your url. You can see example in the above image.
Now let us discuss all tools about draw tab one by one.
Draw with mouse and touch- if you need to draw something then click on this button after that you can draw.
Eraser- when you are writing something on the sheet and you suddenly make mistakes and you want to earse mistake that time you can use this tool. First select click on the eraser tool and click over the mistake after that your mistake will be erase.
Add pen- If you want to add more pen here. Then you can use this tool. Here you can add pem with different size.
Ink color selector- there are many colours available here. You can use any colour according to your need. If you want to make a custom colour then you can create from here.
If you want to download ms excel then you can download it from the below download button.
If you have any doubt then you can write down in the comment box.
Thanks a lot my dear.


टिप्पणियाँ
एक टिप्पणी भेजें
If you have any doubt. Please let me know